Stereoscopic Imaging
Final - Stereo Composite
This was an independently guided project which I created the requirements and goals for. I decided to combine my final project for Tech Comp and Stereo together to work on a stereoscopic composite and to learn about the different workflow that is created to address such a need. I also decided to try my hand at match moving.
Stereo - Aston Martin DB5 -- Red/Cyan Anaglyph from Sean Dooley on Vimeo.
Overview
This assignment was pretty straightforward - just go out and photograph the world in stereo. We were to observer different visual depth cues and to observe how they affect the perceived depth of an image, whether it was a stereo image or not. We were also required to observe how simple things such as reflectivity and specularity and how viewing that subject matter is radically different and more complex in stereo. The overall goal was to try to create beautiful images, in and out of stereo, while specifically working to reduce any viewing discomfort - i.e. cross talk, pinning, etc. I will have to warn everyone though, I did try to push those things a little far and so there may be some discomfort with some images. I wanted to see how much depth I could create, or see how far out I could bring something while still trying to push the rest of the environment back far. I just experimented and had a lot of fun. I took and made WAY more stereo images than what you see here.
Review
What I Learned/Challenges
- I learned how to work with stereo footage in Nuke.
- I learned about shooting stereo footage and things to take into consideration. Problems that I ran into were different exposure values for the video (for some reason) which washed out one camera's footage and not the others. I also learned about the importance of verifying that the cameras are not toed-in to simplify the stereo camera track. Or at least I learned how to deal with that and how to try to track a toed-in camera rig. I learned about how the little differences (even the bumpiness or jitters) in each camera can DRASTICALY affect the stereo effect.
- I was severely challenged with tracking a stereo camera rig and getting that track into something that Maya could use.
- I was challenged with dealing with such a complex object and the number of shaders that were involved and in managing a large asset for compositing. It also made render management that much more important and in finding ways to optimize and reduce render times as much as possible.
- I was challenged getting the car composite/match to look and feel right, especially without having a high quality or real life example to work from. I found it difficult to get the correct looking specular highlight and getting a specular highlight with the correct color value/intensity. I found it difficult to find the right balance between reflectivity and the car body color without making it too reflective or too dark of a color.
Future Improvements
- I would like to focus a lot more time and effort into getting the composite itself to work correctly. Adding a facing ratio type of effects to the specularity/reflectivity would be helpful, for the car body and the windows in particular. Maybe creating a XYZ Position mask to create that effect in post would simplify that process.
- I would like to see if I could create a HDR chrome sphere for this composite to help create and add some value back into the chrome where it's lacking. I also want to focus on filling in some of the blacks a little more.
- It was suggested that I use the Fill element to color in the Specular layers - to use the Specularity as a mask. I also need to focus on developing the rubber shader for the tire significantly to make it more photoreal.
- I want to bring up the color value of the grey for the car body, bring it closer to silver instead of a dark gun metal.
- I would like to develop this project further (once the integration is developed as well) and to incorporate some of the elements of the Bond car that I built a while back. I think it would be fun to have the ejector seat function (which might require the development of my own foreground branch and moss set for the car seat to interact with), add some smoke and oil to the back. Maybe just have the car move through the scene, just to have a larger interaction.
Technical Breakdown/Extra Information
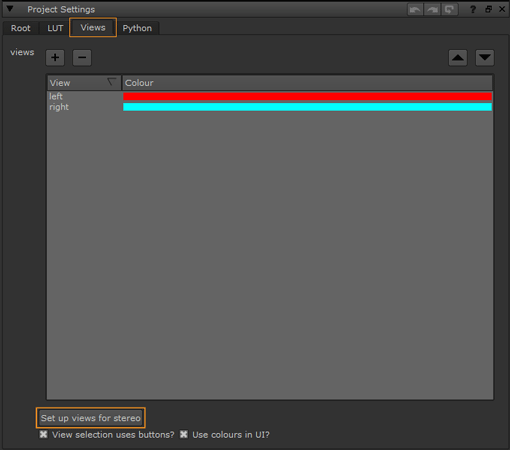
To make the basics of this workflow in Nuke work properly, there need to be a few steps taken to set it all up. The first is that the Nuke Project Settings needs to be modified. To open the Project Settings, go to Edit > Project Settings (or the 'S' key), go to the Views tab, and then click on the Set up views for stereo button. That is a preset button that will create two views, one Left, one Right. This could be done manually of course by using the + or - buttons at the top of the Views tab. A side note: the default color for the right view is Green (I changed mine to Cyan to keep things easier for me.
|
A suggestion is to click on the Use colours in UI? check box. That will change the color of any UI arrows that are specific to either left or right file streams. See the below image to see this effect.
|
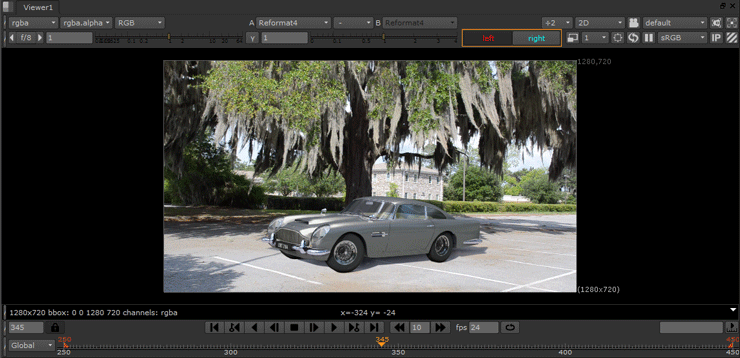
A side note for working with stereo footage: by using the Viewer tab, there are two buttons that you can use to switch between which view you're looking at currently. It's straightforward, but the Left button will display the left view while the Right button will display the right view.
|
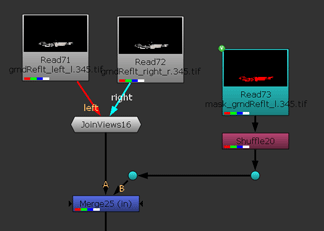
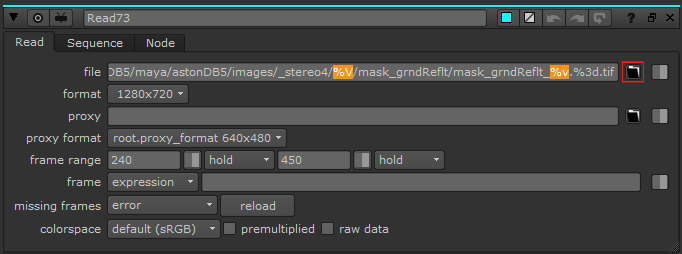
The final thing to know how to work with is the Read nodes. The file browser button (in the red box) does not work with this method. There are two file path variables that work (highlighted in orange), %V and %v. These variables will be replaced by the view names that were set up in the Nuke Project Settings earlier. The %V variable will use the entire view name (left or right), while the %v variable will use just the first letter of the view name (l or r). It is important to note that Windows and Linux treat these variables slightly differently, but if you use lowercase names, it will work regardless of the OS. Windows will accept upper and lowercase names, while Linux will only accept lowercase names (if I'm remembering this correctly).
For example, my below image has the file path of B:/tech420/p3_astonDB5/maya/astonDB5/images/_stereo4/%V/mask_grndReflt/mask_grndReflt_%v.%3d.tif
In terms of the file path that will be used for the left image, that will read as: B:/tech420/p3_astonDB5/maya/astonDB5/images/_stereo4/left/mask_grndReflt/mask_grndReflt_l.%3d.tif
while the right image will read as: B:/tech420/p3_astonDB5/maya/astonDB5/images/_stereo4/right/mask_grndReflt/mask_grndReflt_r.%3d.tif
|
---------------------------------------------------------
This class introduced the founding principles of stereoscopic imaging and it's applications, restrictions, limitations, and development in a variety of mediums. It highly encouraged experimentation to help the class further it's understanding of stereo and simply what works and what doesn't work.
All work was developed for viewing anaglyphicly using Red/Cyan (or Red/Blue) glasses since that was the best and easiest method to review the work during the development process. If you want to get your own anaglyph glasses, check Rainbow Symphony (they will also send you a free pair of anaglyph glasses if you send them a self-addressed, stamped envelope). I do still have the full color original sources if they are desired, I simply don't have a way to display or view them myself.