Digital Lighting and Rendering
Shadows
Introduction of the four main types of lighting inside of Maya, exploring the advantages and disadvantages of each method.
DLR - Shadows from Sean Dooley on Vimeo.
Overview
|
| Raycast |
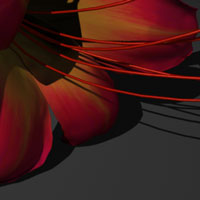
This project focused on the four main types of lighting computations that are available within Maya and how they relate to the visual differences in light and specifically the cast shadows. The first two are the most similar in that they use Maya Software (instead of MentalRay) to calculate the light and the shadow. They are also the fastest to calculate/render. They are Raycast (Depth Map) Shadows and Raytracing. Raycasting does not calculate translucency or transparency - it only calculates if a surface is in light or not, if it's in light, it will have the color of the surface, if it's not in light, it will be the color of the shadow. The effect is creating by taking a picture from the light source and creating a "secondary" image that shows which parts of the viewed surfaces are shown (seen by the light, thus receive light from the light source) or are hidden (thus in shadow). This method also creates really hard and fine shadows.
|
| Raytracing |
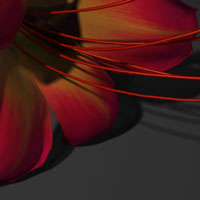
Raytracing on the other hand can create much softer and "blurred" shadows. It too creates that "secondary" image from the orientation of the light source, however, it can calculate transparency and translucency, and it can also soften the edges of the shadow. It is able to achieve this effect by sending out more than on ray, essentially, more than one path of information to calculate the fall off and decay, and also the softness of light over a given distance.
|
| Photons |
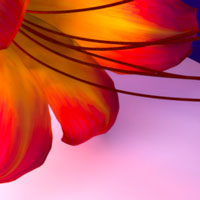
The other two methods of calculating light are much more complex and expensive. The third is Photons, which you can think of as reverse raytracing. It behaves much like raytracing in that is sends out a ray into the scene to gather information and change the value of the light over the life of that ray, but with Photons, it not only is emitted from the light and travels in a single direction, the rays of light that are emitted by the Photon emitter also travel back up the path of the ray, all the while collecting color information and "sharing" that color data with the earlier surface. This behavior is also known as color bleeding or radiosity and it is a very expensive, but also realistic behavior to light.
|
| Final Gather |
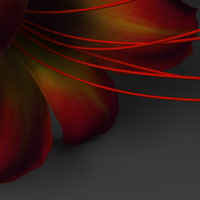
The fourth and final method is a method for calculating global illumination (light across the entire surface, mimicking the effects of sunlight in a way) called Final Gather. Instead of using traditional light sources and emitted, this uses emitter planes that create incandescence instead of light source intensity. This light is one of the softest in terms of shadows because it's light being created form a larger surface instead of an infinitely small point like a "traditional" light source light.
The final part of this exercise was to then further explore with the advantages and disadvantages of these four main methods of lighting calculations to find ways to work around and with the limitations of each method while trying to focus on object-centric photorealistic lighting and rendering.
Review
What I Learned/Challenges
- I worked a lot on my Photon renders and while doing so, I learned a lot of the advantages and limitations of that lighting calculation. I also pushed my current computer's hardware limits, finding out that Photon rendering is mostly based on the number of points it can create by using RAM instead of CPU to create that data - my current computer's 8GBs of RAM could successfully create about 100 million points before it would crash.
- I had some challenges creating a smooth enough, yet accurate enough Photon render that also had a really strong shadow like I know is possible.
- I also learned how to use Final Gather (this was my first real introduction to the lighting method) and how that light works and behaves.
Future Improvements
- I would like to try my Photon render again later when I have better hardware to push the realism of the render further and to create more points to keep that stronger shadow and color that I know is possible.
- Work on creating a better more realistic shader for the flower petals and stem.
- Work on smoothing out the banding and compression of my final renders in the background values.
---------------------------------------------------------
This class focused on the foundations of lighting and rendering using Maya. It started by introducing the main different types of lighting computations inside of Maya and then evolved into incorporating those founding principles into more complex and realistic projects, such as the match to life assignment or the mood alteration. Both of which test our skills in understanding the principles of lighting (in Maya and real-life physical light) and the compositing/compounding effects of light.