Technical Direction for Compositing
Ball and Non-Reflective Surfaces
Using a simple object with simple, non-reflective surfaces, introduce the concepts of photorealistic integration through compositing through render layers.
Tech Comp - Ball from Sean Dooley on Vimeo.
Overview
For this project, I was provided with a few background plates that were necessary for developing a successful composite: a clean background plate, a background plate with a grey cube to help match perspective, a grey sphere in the light and in the shadows of the background plate, and a chrome sphere in the background plate. With these few images, I have the main components necessary to integrate a CG element into the environment.
The basic workflow is as follows. I take the clean background plate and, using the shadows in the photograph, I paint the background plate so it looks like the entire environment is in shadow. Ideally, it would be best to shoot a shadow background plate on location, but that wasn't provided for this exercise. So that new image is used to fill in the mask created by Maya's shadow render layer. The chrome sphere is used as a reference image for the fill layer element - picking up the colors of the environment and putting them onto the object. The cube is used to match perspective with in the Maya environment by hand/eye - since the cube is a known size, it helps to create a proxy inside of Maya to match it with. Then inside of Maya all of the necessary lighting components are developed, rendered out, and taken into Nuke. Once the Nuke script has been created, the two plates of the grey sphere (one in light, one in shadow) are used to help color match the diffuse and the specular lighting elements. Since the sphere was painted a middle grey, the color can be picked right from the different parts of the sphere.
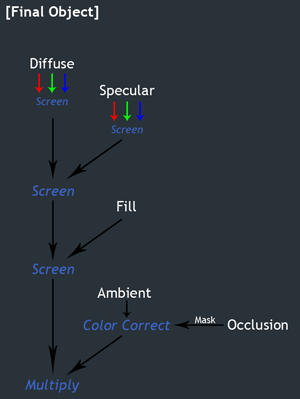
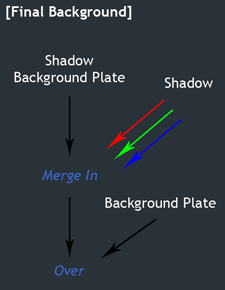
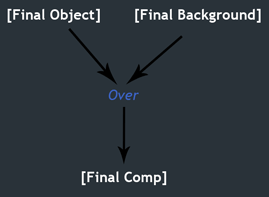
And that's the basic premise of this workflow. The Diffuse, Specular, and Fill elements are Screened together. The result of that is then multiplied with the result of the Ambient multiplied with the Occlusion component (to create the correct Ambient Occlusion). That creates the "final" of the object itself. The other branch of the tree is the background (shadow) elements. The shadow render layer is used, like described earlier, as a mask to "read in" the painted shadow background plate. Ground occlusion is then used to darken the shadow (and only inside of the shadow mask) then the result of that is placed on top of the original background plate. Finally, the result of the object "branch" is merged over top of the result of the shadow and background plates.
To continue this exercise, we were not only tasked with recreating a grey sphere but also to use another basic object in the scene to show off our understanding of this process. Unfortunately, because of time restrictions and troubleshooting at the time of the due date for this project, my second object (my Eagle Pill Case, reused from my DLR class) was quickly (and sloppily) integrated.
Review
What I Learned/Challenges
- I learned of the proper Maya to Nuke integration and workflow.
- I was challenged with additional camera matching by hand.
- I was challenged to incorporate multiple objects into my scene as well as learning how to efficiently manage the objects separately and together so as to render efficiently and only render what I needed.
Future Improvements
- Work significantly more on the integration and match of my second object (Eagle Pill Case).
- Work on the perspective of my camera match more - it feels a bit off. If you watch the line of the light and shadow on my ball, as it moves further away from the camera, the line changes how it wraps around the ball. I feel that that might be a result of the camera's focal length.
- Work on the accuracy and detail of my painting of the shadow background plate, especially around the little weed that is in between the cracks.
- Refine some of the details of the match for the ball: color match, bump, wood grain, etc.
Technical Breakdown/Extra Information
Below is a simplified breakdown of the Nuke script. Obviously, there are nodes that are missing (such as Color Corrects to control the intensity) and Shuffle nodes (to isolate color channels). I have represented when you use a color channel as a mask by showing three arrows, one for each color. You won't always use all three color channels, but it's just a representation.
|
|
|
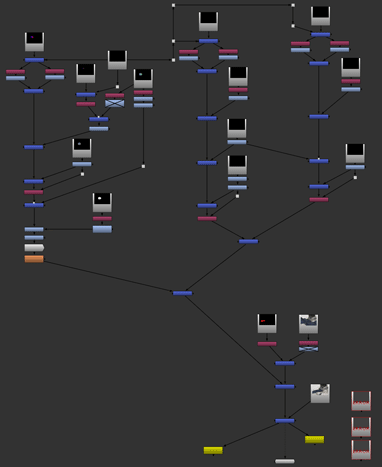
Below is what my node script actually looks like in it's entirety, but it also includes a second and third object as well as a few more layers and nodes to refine the details.
|
---------------------------------------------------------
This class focused on the development of a complex render layer and compositing workflow between Maya and Nuke. It took the traditional beauty pass and split it up into the individual elements for further control in Nuke. The first project focused on non-reflective objects (to show the basics to an object's integration) and then developed into reflective objects and surfaces. This class emphasized photorealistic compositing and integration through diverse controls and manipulations in post-production.