Technical Direction for Compositing
Final - Advanced Compositing and Match Move
This was an independently guided project which I created the requirements and goals for. I decided to combine my final project for Tech Comp and Stereo together to work on a stereoscopic composite and to learn about the different workflow that is created to address such a need. I also decided to try my hand at match moving.
Tech Comp - Aston Martin DB5 -- Left Eye from Sean Dooley on Vimeo.
Overview
I developed the goals of this project myself and I really wanted to combine what I learned in my stereo class and see if I could create a working stereo composite. My first goal was to figure out the Maya to Nuke stereo workflow, more specifically how Nuke could deal with two separate streams of data (a left and right eye image) and still apply the same modifications to each stream of data so my Nuke tree could be simplified. This turns out to be rather easy to do in Nuke by setting up the Project's settings to incorporate two views (a Left and Right view) instead of the default one view (Main view). That simple change solved my first major problem since any file read in (using the correct path variables) would act by reading in both the left and the right eye images into one file read node.
My second goal was to do a camera match move (just a simple pan since this was my first attempt), and then once I got one working, to then also figure out how to track a second camera. I shot my background plates first, using two Nikon D7000's on a tripod rig I built . Both cameras were using the same settings on Manual shooting mode (as far as I could tell), and using comparable focal lengths (I was unable to get them completely identical because the two cameras I had access to had different telephoto lenses, but I did my best to set them to the same focal length). After shooting my background plates, I found that I didn't do a great job at getting the source footage and that created some new problems for me. So I created new issues for me to try to address and work around in post. Some of the problems were a toed in camera rig (that was unintentional), different exposures between the two cameras (resulting in the right eye being washed out and losing important details), and not attaching the cameras tighter to the tripod rig (which created slight, but unique movements between the two cameras).
To camera track, I tried a variety of methods to get a working stereo rig that Maya could use. Since I've never done a camera track before, I got in touch with Carmen Wong and I followed her tutorial here on how to track in Nuke. I also tried Boujou to see if I could get a better result. I found Nuke's camera track to be the most accurate solution. I also discovered that if you gave Nuke stereo footage to track, it would take that into account during the track and the camera solve to actually create a stereo camera rig for export instead of a single camera. However I ran into some trouble trying to get the camera data from Nuke into Maya and after talking with Carmen Wong again she pointed me to this wonderful plug-in for Nuke which is here. After about 20 different cameras and tracks, I finally got something workable. But in the process, I learned about the added difficulty of working with a second eye and that any imperfections in one track would ruin the track of both when it came to the final stereo composite. Because even if one eye was locked down and perfect, if the second eye slid even a little, it would make the entire object look like its sliding in stereo.
After taking care of those issues as best as possible in the time I had, I developed my skills further in dealing with reflectivity in compositing, especially with chrome materials. So I developed a much more complex Nuke script to take care of the advanced reflectivity and the large variety of differences. In terms of dealing with the stereo aspect of the reflectivity, I used (for the most part) the same images for both the left and right eye to reflect. This worked since the difference between the left and right eye images was so small (much to my advantage). In some cases, I reflected a different ground for the car to reflect for the right and left eyes to be more accurate. One of the problems with reflectivity in stereo is that reflectivity and specularity is entirely view dependant, so any changes in the view will affect not only what is seen in the reflected area (or specular area), but also the size and shape of that area. I tired to minimize the visual disparity between these two eyes as much as possible by keeping the left and right views as close as possible. I was able to get the car in the correct stereo depth fairly easily once I was able to solve both cameras so that didn't turn out to be a terrible challenge.
Review
What I Learned/Challenges
- I learned how to work with stereo footage in Nuke.
- I learned about shooting stereo footage and things to take into consideration. Problems that I ran into were different exposure values for the video (for some reason) which washed out one camera's footage and not the others. I also learned about the importance of verifying that the cameras are not toed-in to simplify the stereo camera track. Or at least I learned how to deal with that and how to try to track a toed-in camera rig. I learned about how the little differences (even the bumpiness or jitters) in each camera can DRASTICALY affect the stereo effect.
- I was severely challenged with tracking a stereo camera rig and getting that track into something that Maya could use.
- I was challenged with dealing with such a complex object and the number of shaders that were involved and in managing a large asset for compositing. It also made render management that much more important and in finding ways to optimize and reduce render times as much as possible.
- I was challenged getting the car composite/match to look and feel right, especially without having a high quality or real life example to work from. I found it difficult to get the correct looking specular highlight and getting a specular highlight with the correct color value/intensity. I found it difficult to find the right balance between reflectivity and the car body color without making it too reflective or too dark of a color.
Future Improvements
- I would like to focus a lot more time and effort into getting the composite itself to work correctly. Adding a facing ratio type of effects to the specularity/reflectivity would be helpful, for the car body and the windows in particular. Maybe creating a XYZ Position mask to create that effect in post would simplify that process.
- I would like to see if I could create a HDR chrome sphere for this composite to help create and add some value back into the chrome where it's lacking. I also want to focus on filling in some of the blacks a little more.
- It was suggested that I use the Fill element to color in the Specular layers - to use the Specularity as a mask. I also need to focus on developing the rubber shader for the tire significantly to make it more photoreal.
- I want to bring up the color value of the grey for the car body, bring it closer to silver instead of a dark gun metal.
- I would like to develop this project further (once the integration is developed as well) and to incorporate some of the elements of the Bond car that I built a while back. I think it would be fun to have the ejector seat function (which might require the development of my own foreground branch and moss set for the car seat to interact with), add some smoke and oil to the back. Maybe just have the car move through the scene, just to have a larger interaction.
Technical Breakdown/Extra Information
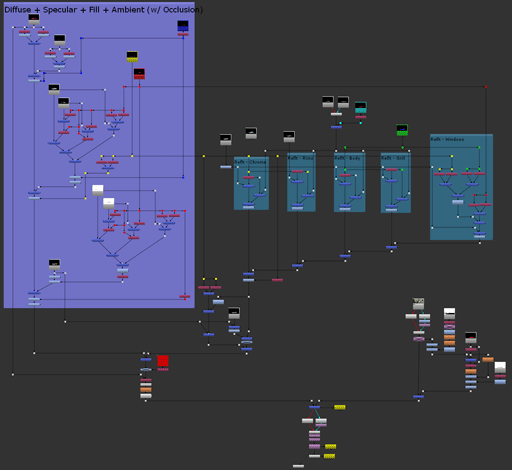
For my final project, I needed to develop a significantly larger Nuke script. As a result, organization and efficiency of reusing as many of the same Read nodes as possible became extremely important. It still uses the same basic foundation that has been described in the past two project breakdowns.
|
---------------------------------------------------------
This class focused on the development of a complex render layer and compositing workflow between Maya and Nuke. It took the traditional beauty pass and split it up into the individual elements for further control in Nuke. The first project focused on non-reflective objects (to show the basics to an object's integration) and then developed into reflective objects and surfaces. This class emphasized photorealistic compositing and integration through diverse controls and manipulations in post-production.