Added Functionality for Maya: File Sequence of Final Gather Maps
Back to Extras main page
Link to NEW Scripts and Walkthrough.
Maya and Final Gather
Final Gather (FG) in Maya is a wonderful thing. It creates beautiful softly lit scenes that we all know and love. However, the single largest downside of FG renders is the render time. Now there are ways to reduce that render time (specifically to create a FG Map and bake out the lighting information into a secondary file that is then referenced and called at render time only), but there is one severe limitation to that method - if your FG lighting changes, the FG map that was baked out won't show that change!
That was my inspiration for these scripts - it was to find a way that would allow for the reduced render times from baking out a FG map while still allowing for FG lighting to change. This was brought on by work on my Mood Alteration project. As a result, I created three Python scripts. You can find and use them freely. Please email me with any suggestions, or problems, or changes, or questions. I'll do my best to help and modify them as necessary. And if you like the scripts, I'd always love to hear about it or hear how you implement or modify them. I love to learn better ways to do simple tasks.
| fgBake.py | maya_fgRender.py | readMA.py |
| ZIP with All Three Scripts |
Quick Breakdown of My Process
What I managed to do was thus: I found a way to use a file sequence of FG maps that are brought in at render time only, and I found a way to do this from the Windows command line (to reduce the overhead and to maximize CPU performance). I developed three scripts: the first runs inside of Maya to create the FG Map files, the second creates an executable Windows batch file that hold all of the render commands for direct use from the command line, while the third is a Python function that is referenced by the second script to make changes to the Maya ASCII file to allow for the different FG maps to be used for their respective frames.
Starting Notes - Setup and Basic Limitations
There are a few things you need to know first:
- The three scripts that I created should be in the same folder. You can place that folder anywhere, you can name the folder anything, but you need to make modifications to some of my scripts on a few lines so the scripts can find each other. See below for details.
- This process will create a lot of very large files (the .fgmap files). Make sure you have the disk space. Depending on your settings, these files can be around 100-200MBs per file, or larger. There is going to be one file for every frame. You need all of those files for this process to work. They need to be where Maya can find them (just leave them in their default location in the project structure: /renderData/mentalray/finalgMap).
- Be sure you make the necessary changes to the code that is specified further below on this webpage. These scripts are currently written for my personal computer and I haven't taken the time yet to automate the process more for other users. You will have to change a few file and system paths for your own setup.Outdated
- My second script (m11_fgRender.py) will create a file on your desktop (or wherever you put the file when you change the file location later on) -- that file needs to be moved to folder with the Maya scene file that you want render for it.
- My third script (readMA.py) will change the .ma file of a scene so it references the correct .fgmap, but for that to happen, currently (26 April 2011) that attribute needs to already exist. In plain English -- the saved file need to say it'll use a .fgmap. Any map will do, the .fgmap doesn't even have to exist. The saved scene file just needs to think it does so it'll create the necessary attribute that my third script looks for.
Below while I describe this process, I'm going to make some assumptions that you're at least familiar with Maya and running scripts (specifically Python) inside of Maya. I'm also going to assume that you know how to edit .py or .bat files (any text file) so you can make the necessary changes to set them up for your workstation. If however I describe something you aren't familiar with, or I do a poor job explaining, please shoot me an email.
Running the Scripts - From Maya to Windows Command Line to Final Renders
Note: The majority of the step-by-step inscructions below have been outdated and have been updated on my Walkthrough page. But I have left these instructions here because they still work well in supporting the graphics for the three main steps of this process.
Part 1 - Maya and Python
 |
- Step 1 -- Open Maya and your scene file that you're working with for the FG render.
- Step 2 -- Load in the fgCloud.py script. Now you have three options: 1) use the FG quality setting in my script, 2) modify the quality settings in my script, or 3) delete those lines altogether depending upon your needs and use the quality settings that you already have set up in your scene file. All three work - choose what meets your needs the best.
- Step 3 -- After figuring out how you want your FG quality settings, source the fgCloud.py script.
- Step 4 -- Run the fgCloud.py script, either leaving the default values (it will run through your entire scene, frame by frame, from the start frame to the end frame) or specify the frame range you want to use, for example: fgCloud(5, 80) will bake out the FG map from frames 5 to 80, inclusively.
- Step 5 -- Leave. Go do something else for a while - this'll take a very long time. On average, I've seen a bake at my default FG quality settings, rendering at 1280 x 720 resolution, take about 20 minutes per frame to bake out. This is something I do before I go to bed, or when I don't need my computer for a weekend.
- Step 6 -- However, it might be good to come back every few hours just to make sure that you haven't run out of disk space -- it'd be a good thing to check on, don't cha' think?
Part 2 - Python, Windows Batch File, and Windows Command Line
 |
- Step 1 -- Run the m11_fgRender.py script. This script will query the user for all of the information it needs to know to do its job. It'll use the highest settings for render performance (this is currently set based on my computer, you might want to check to make sure it'll max our your computer's settings as well - see below for editing details).
- Step 2 -- m11_fgRender.py will create a Windows batch (.bat) file (my default is on the desktop). Make sure that once it's created, move it to the scene folder that contains the scene that you want rendered out. This is to allow for a relative system path to the scene file.
- Step 3 -- Run the batch file and wait. It'll first create (if you said to) a log folder where the render logs will end up. Then it'll just work it's way through the frame range that you set up and render each frame at a significantly decreased time. There is no need for the renderer to recompute the FG maps since they already exist. My scripts will do the rest of the work and make sure that the rest of the render process is seamless and all you have are rendered images.
- Step 4 -- Depending on your needs, you might want to delete the numerous .fgmap files to clear up disk space. Or you could keep them for future renders. They store the lighting data created by FG emitters and that's it. It is view dependant, so if you change the geometry, there might be "patches" or "holes" in the lighting. Also if you make changes to the lighting quality, color, or anything like that it, obviously, that information won't be in that bake file unless you rebake the FG map. But if you make changes to the textures, or other Raytrace lighting or surfacing qualities of the scene, they should not negatively affect the render quality.
Breaking Down The Trick - m11_fgRender.py, readMA.py, and How They Work
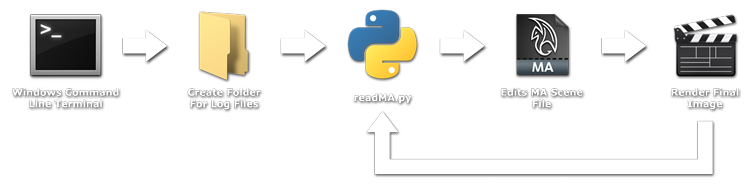 |
As I said earlier, my second script (m11_fgRender.py) creates a .bat file based on user input for the specific job. What makes this .bat file special is the order it functions. The first is simple: it'll create a folder for the log files (if you told it to do so) at the given folder destination. I found this helpful for troubleshooting and datamining my render times and processes. Then it goes into a loop, first calling the third script (readMA.py) and then render a frame. Then it repeats this process. The real tricky part is in the third script (readMA.py), for what this does is it goes in to a given Maya ASCII (.ma) file line-by-line looking for the line of code that designates what FG Map it is referencing for the render, and then it changes that line based on the naming convention of the FG maps that were created with my first script (fgCloud.py), which is set up based on the frame number. So the second script (m11_fgRender.py) works by calling the third, changing the scene file to use the FG map for that frame, then it renders that frame, and then it does it again for the next frame.
Currently there is a large limitation with this process (I just haven't had the time to solve it yet) and that is for the editing of the .ma file to work correctly, the scene file needs to already be using and referencing a .fgmap file for it's FG. It won't use that file, but it needs to say in the file that there is a file that it's wanting to reference. This is simply because the attribute for the FG map's file name doesn't exist in the .ma file unless it's trying to call that FG map. I haven't taken the time yet to do an error check for that and modify the script so it'll work even without the attribute present.
The Good Stuff - Direct Comparisons
The Visual Difference
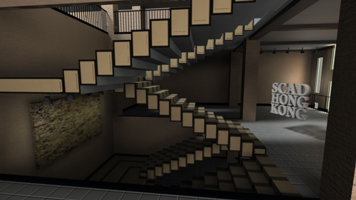
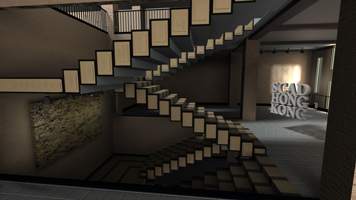
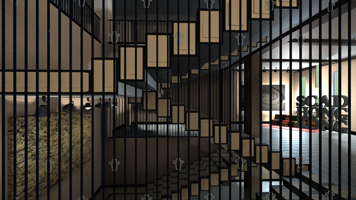
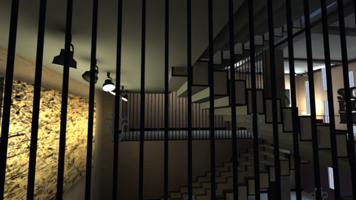
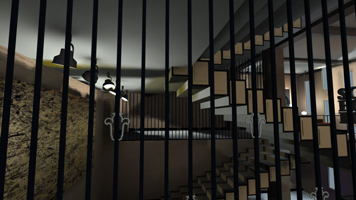
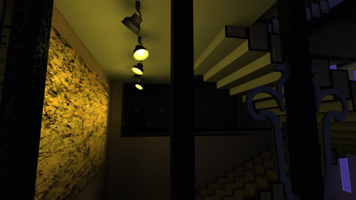
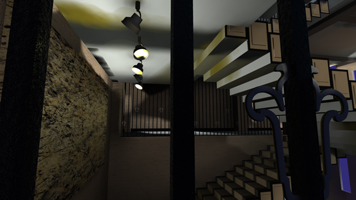
One of the first things I tried to do with FG for my Mood project was to bake out a FG map like I normally would - reusing the same .fgmap regardless of the lighting conditions. I thought it would still show the lighting animations and it would record and save the changes to light, be it quality, intensity, or color. But, unfortunately, the .fgmap doesn't save out lighting changes or animation or anything like that. The below visualizes that: on the left is what the frames/moods are meant to look like (they were rendered using my scripts and unique .fgmap for each frame), while on the right uses a more "traditional" single .fgmap setting for the lighting changes.
|
FG Map Rebuilt Per Frame |
FG Map "Traditional" Bake Method |
|
|
|
|
|
|
|
|
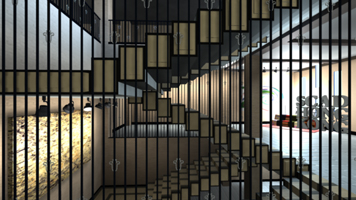
Notice the holes in images on the right, and also how the lighting doesn't really change or match the mood it's suppose to (images on the left). The lighting, for the most part, seems to stay very close to what the lighting conditions (intensity, position, color, etc.) were from the first frame/bake of the FG map. Using a more traditional FG map bake method, you bake one frame at a very high quality setting, and then you add to it with the subsequent frames, each time taking less time to bake out because there is existing data in those locations from the prior frames. Well, same thing here -- there's already light there in the environment, but it's from the starting point/first frame of the .fgmap bake.
The Time Difference
To put it simply: my method is faster!
Plain, simple, and to the point. It's not a lot faster the first time through, but it is still faster. On top of that, it also creates a reusable file that you can use to speed up subsequent renders. Don't like the way things look? Making changes to Raytracing lighting? Changing the surface shader or texture? Impatient (like me!) much? Rerender it! At full resolution and quality for a fraction of the time. Since it's able to reuse the .fgmap, the majority of the render time vanishes and it'll speed up your workflow.
Don't believe me? That's fine. I ran a test render the past few nights to get some numbers. Both were run on my machine, using the exact same quality settings, same files, same render locations, everything. I ran both renders from the command line (same way). The only time Maya was open was to bake out the FG maps for my script run and to make the changes between the two renders. I rendered 22 frames with each method (I was tired of waiting for the other two to make a full second - I wanted my computer back, give me a break). Both were rendered at 1280 x 720 resolution. On the left is the straight render - all through the command line with the FG map and points being baked out per frame, at render time, and then discarded (like a normal straight FG render). On the right are renders with my scripts and following my Python process.
|
|
| Straight Render (w/o Scripts) | My Python Scripts Workflow |
The look the same, don't they? Now for the numbers:
| Straight Render (w/o Scripts) | My Python Scripts Workflow |
| Start Time: 12:45am | Total Start Time: 2:00am |
| End Time: 10:00am | Total End Time: 11:00am |
| Total Render Time: 585 minutes | Total Render Time: 540 minutes |
| Render Time Per Frame: 26.6 minutes | Render Time Per Frame: 24.5 minutes |
The reason I use the phrase "Total Start Time" and "Total End Time" for my Python Script Workflow method is because I had two steps to start and manage - one run inside of Maya, the other run from the command line. So the Total refers to the absolute start and end times to the processes combined. But to break down my render process even a little further, running my first script (fgCloud.py) inside of Maya took 390 minutes total (17.7 minutes per frame) to create the .fgmap file. Rendering of the actual final image file from the command line took 150 minutes total (6.8 minutes per frame). So if I did want to go back, make some minor changes to my scene, I could easily just rerender the final images at less than 7 minutes a frame and get more done in less time. Compared to making minor changes and rerendering and recompiling the FG map with each frame - that would be incredibly expensive, time and resource wise.
Lines 18-20: Edit and/or remove the Final Gather Quality Settings Line 33: If Python is not installed in the default directory, you need to change "C:\Python27\python.exe" in the first part of the line (or use whatever version of Python you want) No edits necessary.
Outdated
Don't Forget to Change the Scripts - Directions for Personal Use
First Script - fgCloud.py
Line 21: Edit camera name - the default is camera="camera1"
Note: This script will change the render mode and FG map build type before and after the FG renders to the correct settings - it changes it for you.
Second Script - m11_fgRender.py
Line 33: Need to change "B:/Documents/_scripts/fgMap_sequence/readMA.py" to be the file path for wherever you put your readMA.py file
Line 38: Need to change "B:/ProgramFiles/Autodesk/Maya2011/bin/Render.exe" for the location of your particular install of Maya
Line 40 or 42: Might need to change -n or -rt based on the number of processors in your computer, and/or -mm or -mem for the amount of RAM you want the render to be able to pick up
Line 66: Need to change 'C:/Users/Sean Dooley/Desktop/' for wherever your desktop is or wherever you want the resulting .bat file to be
placedThird Script - readMA.py
Some Final Notes - Future Updates
I have some goals to continue to improve these scripts and to make it more easily usable for other people (like yourselves) to use. My largest goal is to get rid of the entire section where you have to modify the code line by line for your personal setups. I hope to automate that process and find out how to eliminate that entirely -- I want to make it easier for you guys! Accomplished - See Walkthrough
On top of that, I also really want to make a working version of these scripts (I'll predominately need to change the m11_fgRender.py script) so that it can work under a Linux/Unix environment while still using the command line/terminal for optimization and efficiency. Accomplished - See Walkthrough
I need to modify readMA.py so that it can modify Maya ASCII files so that if the attribute for the FG map name isn't there, my script will create it. Just in case you save a file and remove the FG map for whatever reason.
Finally, I want to experiment and try to find a way to see if I can actually bake out the FG maps from the command line/terminal. I want to see if there is a way that can be done, because currently, the only way I know how to is inside of Maya with a Preview Render and I want to find a way around that. I don't want Maya to ever be open for this process - I want to automate it and simplify it as much as possible!
Closing Comments
So those are my goals for these scripts, and I hope to make those changes over this summer when I have the time off from school. Again, if you have any comments, or suggestions, or ways to improve my scripts or simplify the process, please send me an email - I'd love to hear from you. If there is any way I can help you incorporate these scripts into your workflow, please let me know how I can help make that easier for you. I'll do my best to get you up and running as quickly as possible.
---------------------------------------------------------
I want to thank Ryan Dowlingsoka and Stu Schwartz for their help in my early stages of development for my first script (fgCloud.py). I was still really new and unexperienced with Python when I started this tool and they helped to show and explain and troubleshoot my scripts with me. I've come a long way since then and they helped to push me in that direction.
Link to NEW Scripts and Walkthrough.
Back to Extras main page